What do I want to achieve with my model ?
Questions;
Adding electronics to any model should be considered at the pre-purchase stage and the modeller might want to ask themselves following basic questions when box fondling;
1. What part of the model do I wish to feature and what effect do I want to display? (lights, sound, movement, smoke) – remember each has its own levels of difficulty!
2. Power supply and switch to turn it on/off, where will they go or will I need a base?
3. How will I get the wires from the power supply to the feature without the wires been seen, or can I make the wires a feature of the final model? (A brake cable, hose or pipe.)
4. How will I transition the cables from the model (if there is not space inside – (ship’s hull)) to the base, so they cannot be seen? Perhaps make a wire route through a nose wheel of an aircraft into the base. If the aircraft is in flight then a tube will be required for the cables to run through.
5. How will I transport the model? (Do I need to make the tube/base de-mountable and what connectors will I need)
There are various effects that can be added to a model and they vary in difficulty.
Lighting

By far the easiest is lighting. LED’s (Light Emitting Diode) have now reduced in size and cost, they are low cost and typically have a very long life.
An LED is polarity sensitive (long lead is positive) & so will only work one way round. It also needs an equally specific voltage – too low & it won’t light, too high & you’ve blown it! To make it more awkward the different colours of LED require different voltages. Beginning to sound complicated? Don’t worry, I will make it easier.
Tip 1. To save complicated and differing voltages, I would recommend always buying white LED’s, let me explain why;
· Size options range from <1mm to >10mm
· Depending on the colour output of the LED’s, the voltage drop across the LED will change so it is easier to only buy white LED’s and then colour them with Tamiya Clear paints to get the colour you want.
Tip 2. Heat! Our plastic is precious and heat can/will distort it. LED’s run very cool so are ideal – please do not use grain of wheat lamps they have a filament and do get hot!
There are many different types of LED’s including,
Lightshow (RGB red/green/blue), Bi-colour (two LED’s in one package in different colours
Flashing, Flickering, normal, wide angle, warm white, bright white etc.
Where to buy? Rapid Electronics, Mouser, Component-Shop, Banggood, Wish, eBay etc.
LED’s can be “Frosted” with a file or sandpaper depending on the shape of the light you want.
Power Supply
The type of supply will depend on the voltage and current requirement attributes of the features you install in the model.
If you had a Titanic on permanent display at home then you might consider using a wall PSU. Alternatively, if the model will be taken to a show then you cannot rely on mains power being available.
Example 1
Model has one white LED - So the power supply voltage must be >3.3v DC.
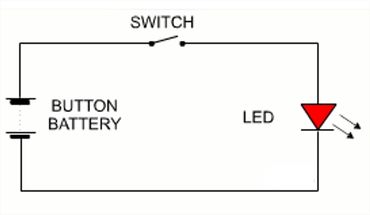
A coin cell 2032 battery at 3v is the simplest of power sources and doubles as an excellent LED tester. The internal resistance of the coin cell means that you do not have to add an extra resistor!
Down side cost of the coin cell and how often you might need to replace it.
Circuit Examples


Calculating the resistance required:
The next easiest way to power an LED is to use a higher voltage than you need and then use a resistor to reduce the voltage. 3 x AAA or AA cells @1.5 v per cell provides 4.5 volts and will last a lot longer but we must now use a resistor to drop the voltage or we will blow the LED!
Thankfully there is an easy way to do this with an on-line calculator
You must consider how brightly you want the LED to shine – so a good rule of thumb is 20 milliamps.
Single LED Circuit

That’s all for now, in the next episode I will cover resistors in parallel and series and fibre optics.
Kind regards AndyT.